You have seen people hanging off a wooden board at the wall and wondered if you should be doing it too. Or you have bought one, screwed it above a door, and now you are not sure what to do with it without wrecking your fingers.
Here is hangboarding for beginners, in short. A hangboard (also called a fingerboard) trains finger strength by having you hang from edges, and beginners can use one if they keep the load light. Use the bigger holds, take some weight on your feet, warm up for a good fifteen to twenty minutes, hang for a few seconds at a time, and stop well before you fail. Keep it to a couple of short sessions a week, and keep climbing as the main event.
We will go through who should start, the kit, the two grips, how to make it easier, and a simple first session.
Watch it first
The pick is from Neil Gresham, one of Britain’s most experienced climbing coaches, on his coaching company’s channel, Catalyst Climbing. In under eight minutes it answers five beginner questions. Should I be doing this, what do I need, how do I stay safe, which grips, and what does a session look like. It is calm, British, clearly filmed and chaptered.
It also puts the safety advice before the training, which is the right way round for a beginner. Of the five videos we graded, it was the one that covered warming up, grips, load and a session plan in a single short film.
Catalyst sells a paid online training subscription, which the video mentions near the end (7:06) and links in its description. The teaching does not depend on it.
The video is chaptered. Who should hangboard starts at 1:09, technique and kit at 1:45, injury prevention at 2:46, grips at 4:26, adjusting the load at 5:31 and structuring your session at 6:16.
Should beginners use a hangboard?
As Gresham explains from 1:09, the old advice was that beginners should stay off hangboards because of the injury risk. His view is that modern training has moved on, and it is now generally thought fine for beginners to use one, especially on larger holds, with a foot in a stirrup to take some of the weight (1:23).
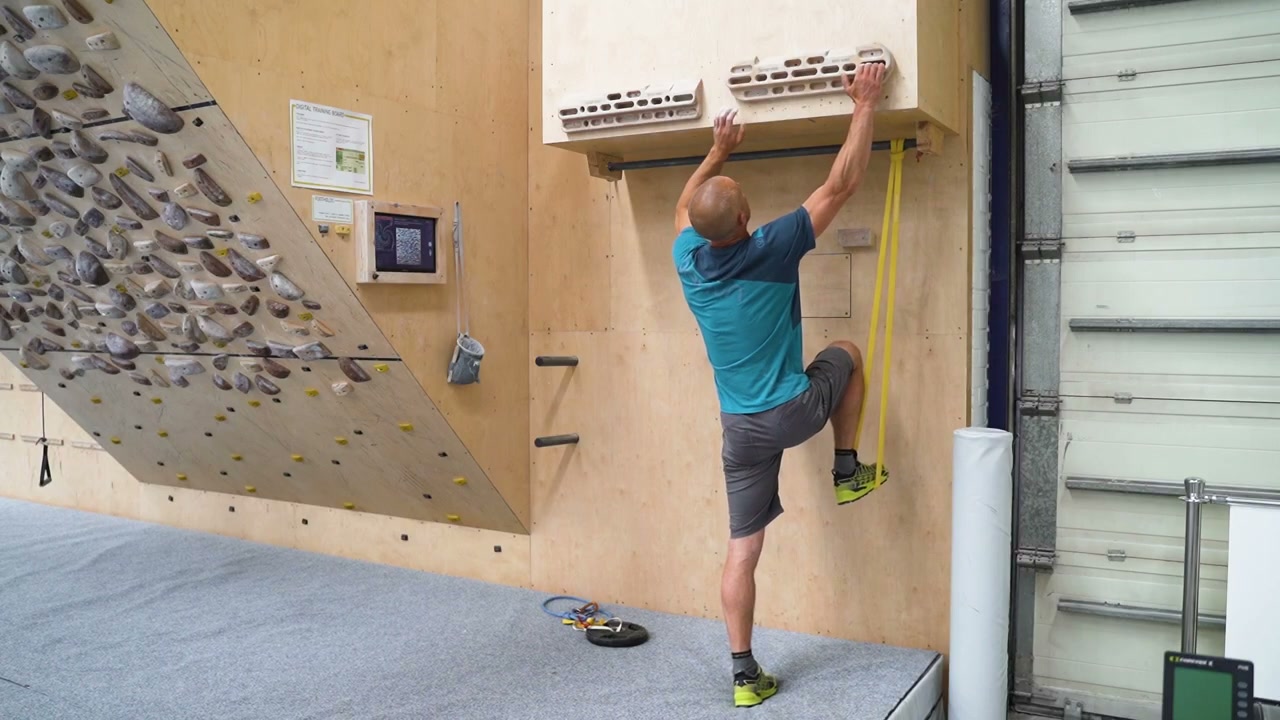
But he is just as clear about where it fits. For a beginner, the priority is technique and skill, and you do not learn movement hanging off a board. Hangboarding plays a supplementary role, and climbing should always be the main event (1:41).
Not every coach draws the line in the same place. Lattice Training’s panel video on this exact question admits it is a hot topic, and for that discussion it defines a beginner as someone who has been climbing for one to two years (9:22). Their guest Jason Hooper, of Hooper’s Beta, makes the point that the hangboard itself is not the danger. The real risk is how it gets added to the rest of your climbing, and because beginners have less tissue resilience and body awareness, that risk is generally higher for them (2:44).
So the honest answer is yes, you can, if you keep it light, and if it is an extra on top of your climbing rather than a replacement for it.
This article and the video are not a substitute for coaching. If you want a training plan built around you, or you have had a finger injury, see a climbing coach or a physio who works with climbers. This guide is written for adults, and neither video covers young climbers.
What kit do you need?
Less than you think. Gresham’s first point (2:09) is that your local climbing wall will probably have a hangboard already. If you are buying one for home, he suggests trying a wooden one and a resin one first to see which you prefer.
You do not need dozens of holds and pockets. As he puts it at 2:19, it boils down to three sizes of edge.
| Edge | Depth (from the video, 2:23) |
|---|---|
| Large | 30 to 40 mm |
| Medium | about 20 to 25 mm |
| Small | about 15 mm |
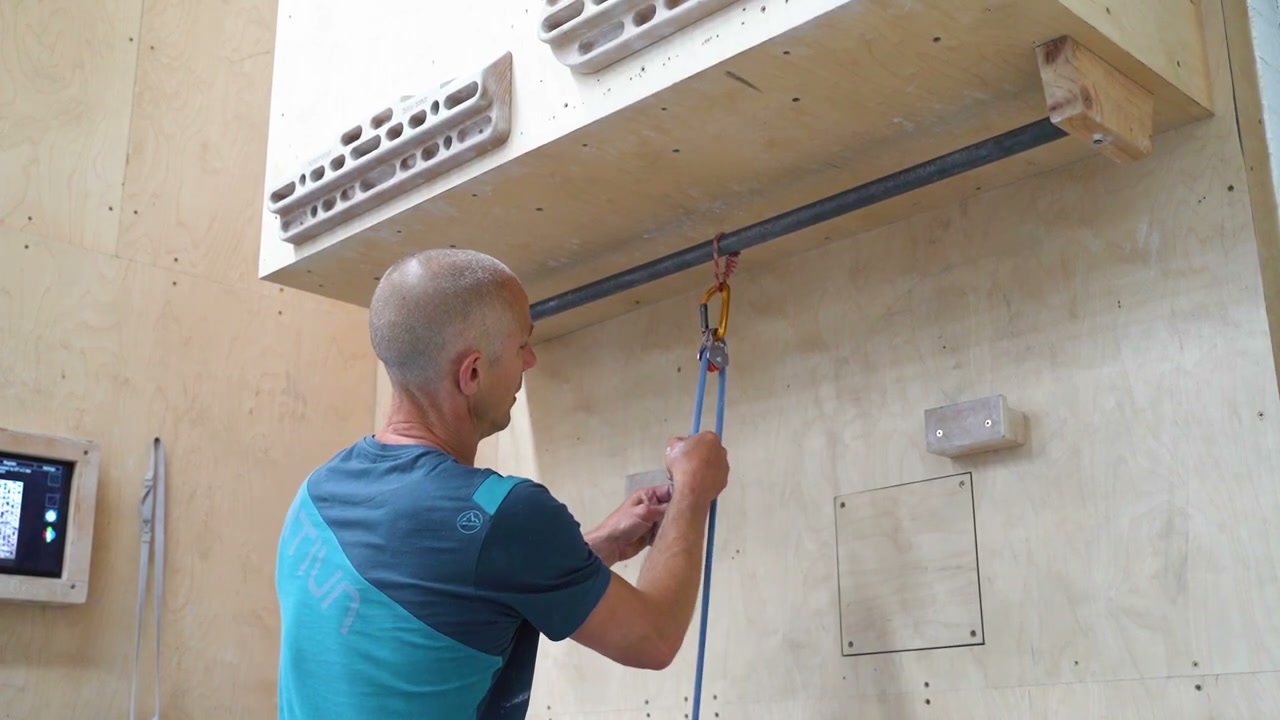
The other thing worth having is a clipping point under the board (2:36). Clip in a resistance band or a rope and pulley rig and stand in it, and you can take some of your weight off your fingers. Gresham calls it really helpful.
Read this before you hang
If anything hurts, stop. And neither this article nor the video replaces a coach.
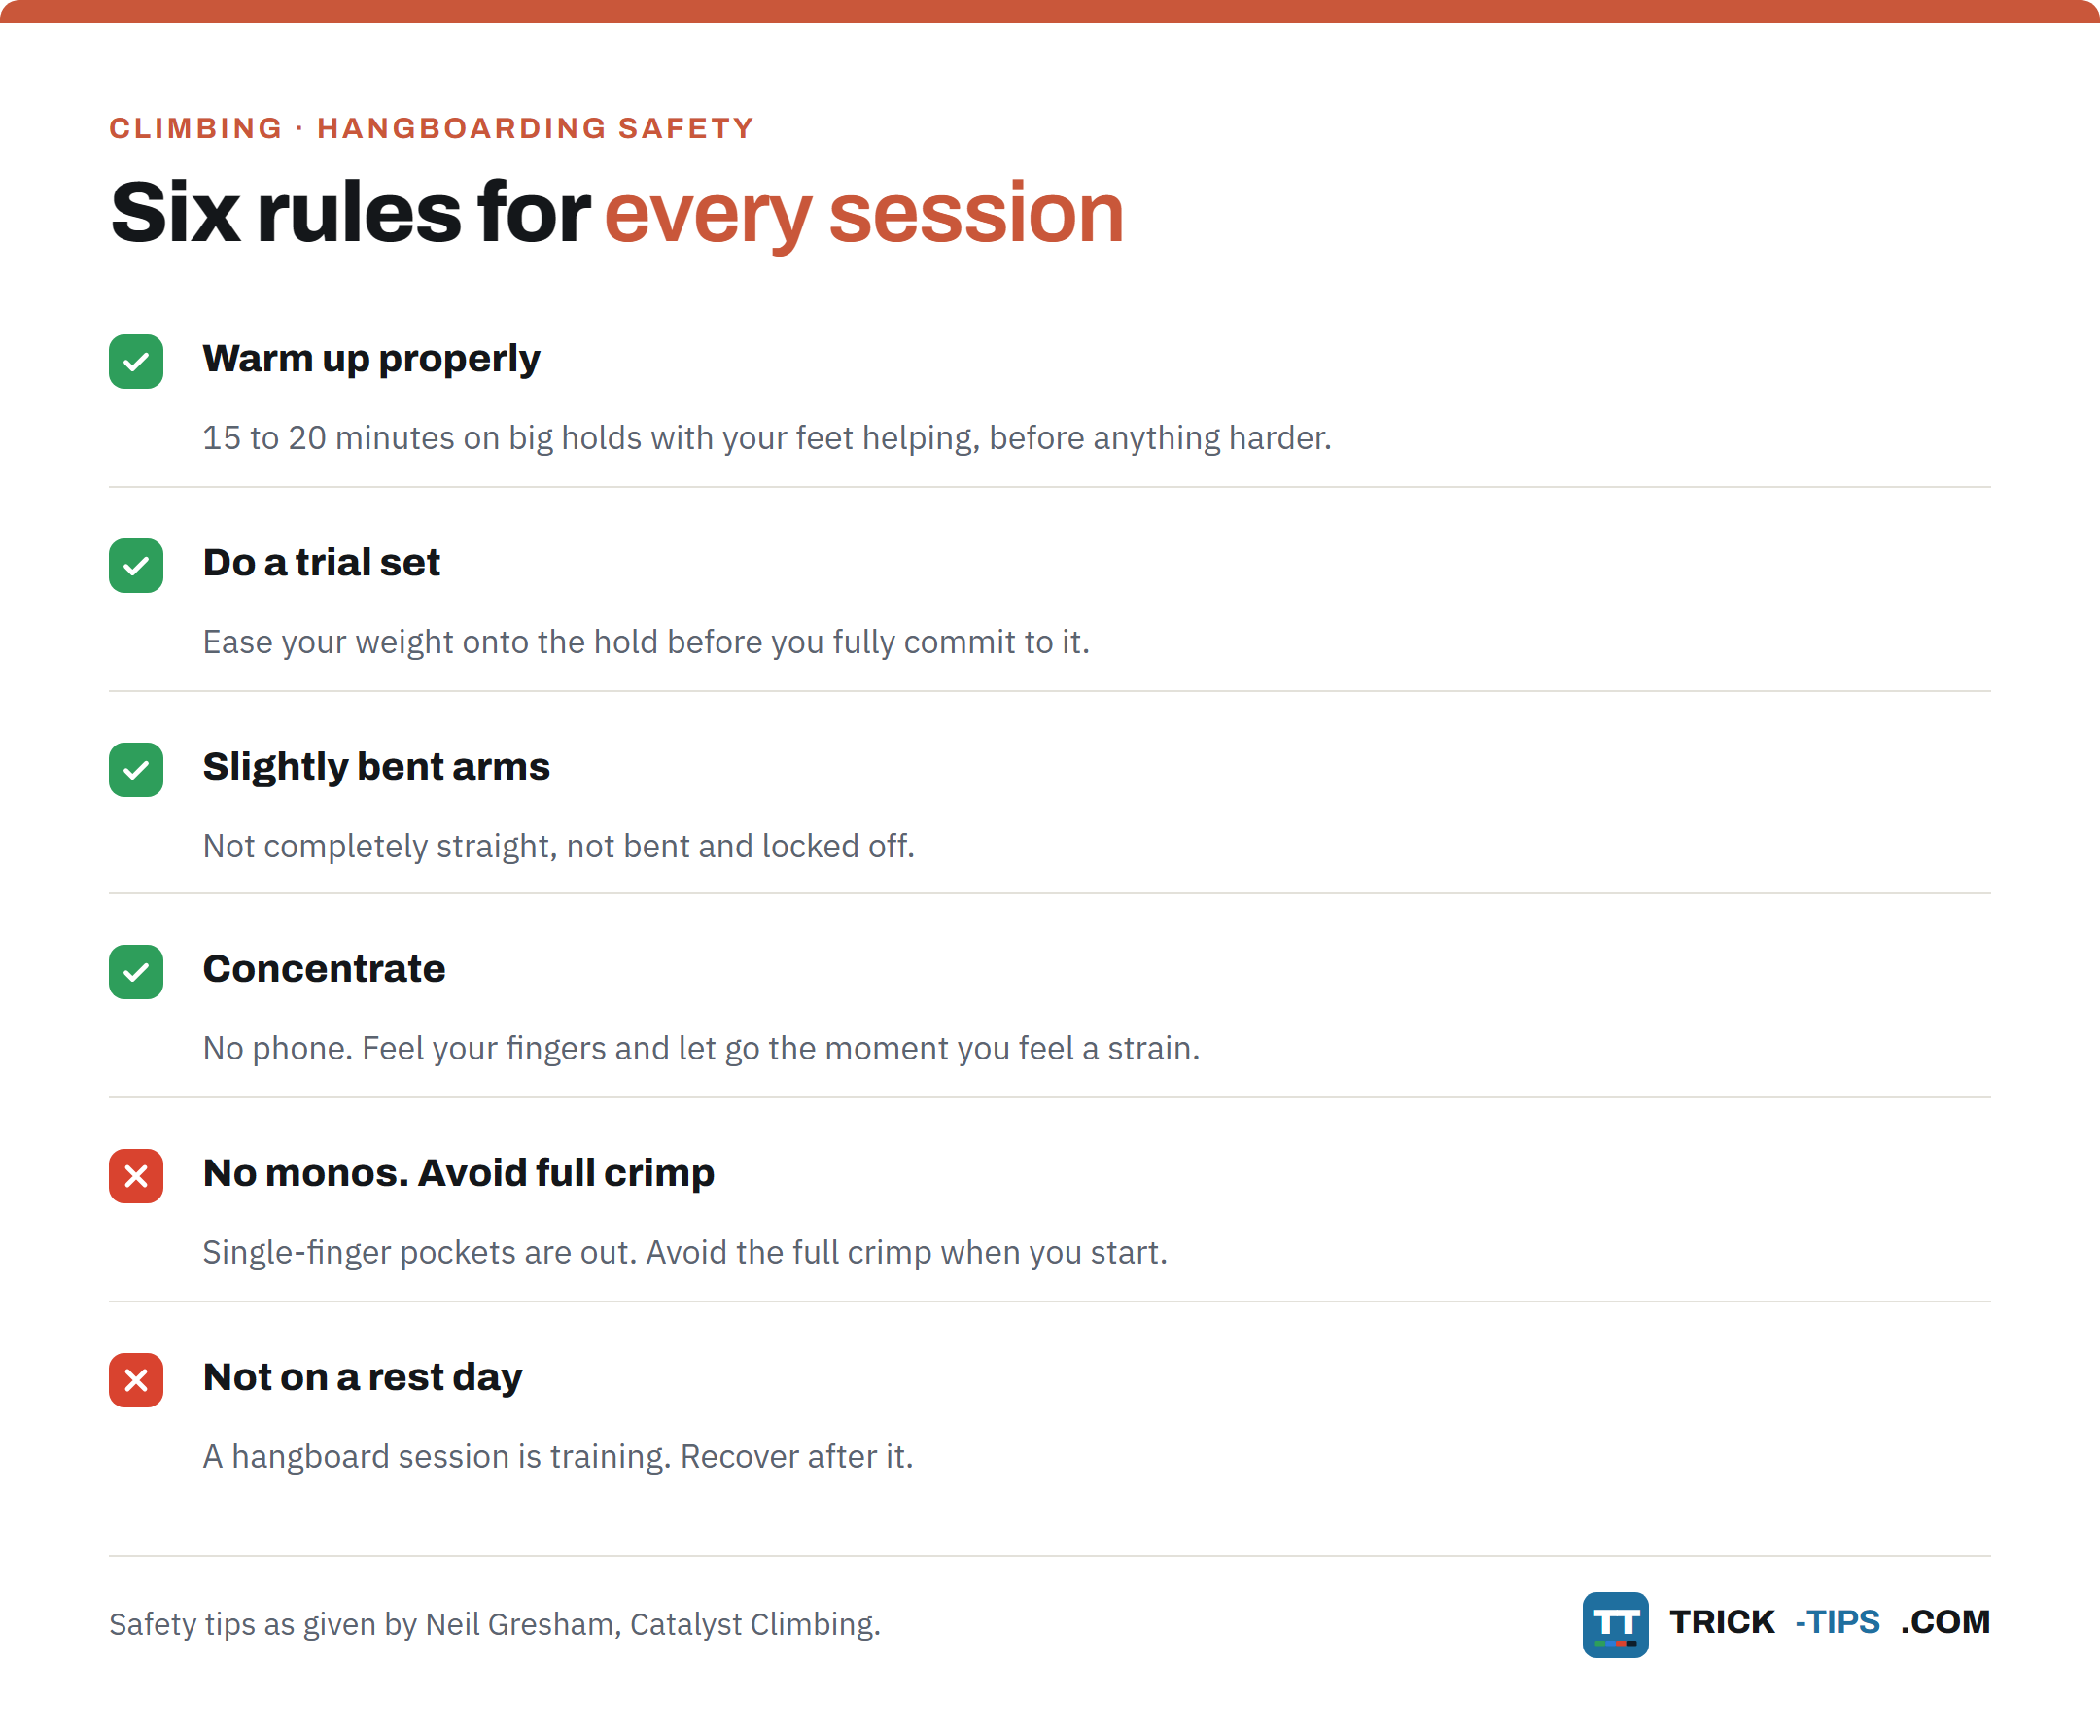
Gresham says at 2:45 that hangboarding often gets blamed for injuries when it is usually the climber’s own error. His safety tips, from 2:54, are the rules to follow every session.
Warm up properly. Several hangs on large holds, with a foot on a chair or in a band or pulley to lighten the load, over at least 15 and more like 20 minutes, with rests in between (2:56).
Do a trial set. When you move onto smaller holds or more load, ease your weight on gently before you commit fully (3:22).
Do not hang with your arms completely straight, or completely bent and locked off (3:35).
No mono pockets (single-finger holes), and avoid the full crimp when you first start (3:41).
It counts as a training session. Do not do it on a rest day (3:53).
Concentrate. No phone. Pay attention to how your fingers feel, so you are ready to let go the moment you feel a strain (4:07).
How do you do a dead hang?
The main hangboard exercise is the dead hang, and it is as simple as it sounds. You hang from the board on a chosen grip and a chosen size of hold (1:50).
From 1:55, Gresham’s points on position are these.
- Arms very slightly bent. Not locked straight.
- Shoulders and upper back engaged, even though it is a finger exercise.
- Body still. It takes a bit of practice to stop swinging, but once you have sussed it you are away (2:02).
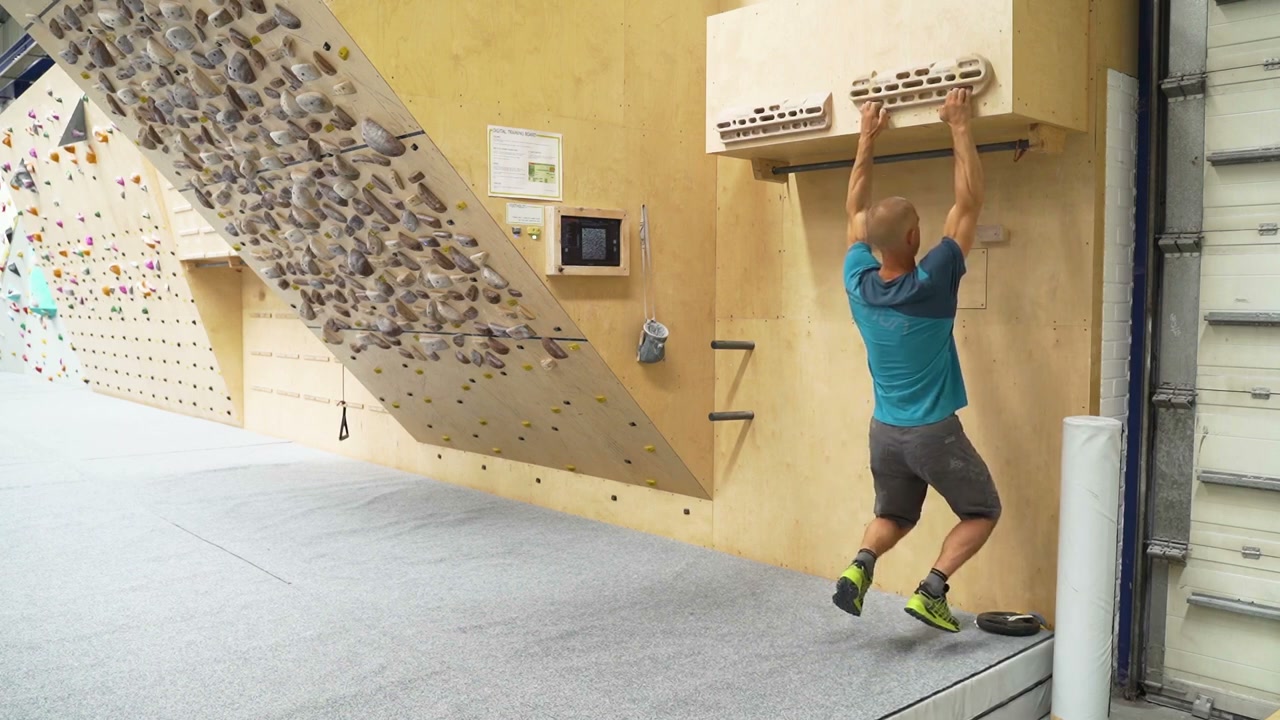
Lattice’s beginner guide adds a few form points from 9:03. Keep your shoulders somewhere between fully pulled down and shrugged up to your ears. Keep your head neutral, looking at the bottom of the board rather than down at your feet. And do not arch your lower back, because that loads your back and shoulders. Lattice is a little more relaxed on the arms than Gresham, happy with straight or slightly bent (10:06). Both rule out a deep lock-off.
Which grips should beginners use?
Gresham teaches two grips from 4:23.
The half crimp. Your fingers bend to about 90 degrees. The index, middle and ring fingers bend at 90, and the little finger stays a bit straighter because it is shorter and has to reach the hold (4:30). It is one of the main grips in climbing, and training it builds versatile finger strength that carries over to all sorts of holds (4:44).
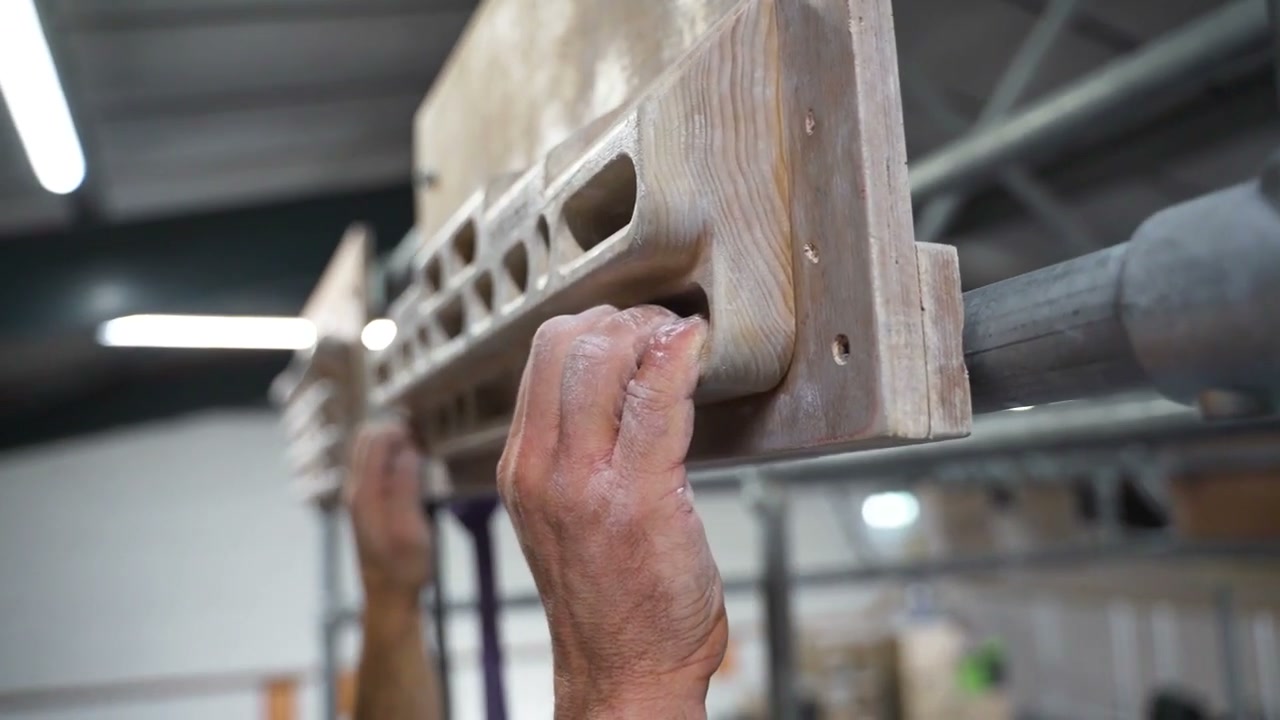
The open grip, on three fingers. Index, middle and ring, fingers straight, with the first finger joint hooked over the edge (4:57). It is a more passive grip, and it is how you always hold pockets, so it is the one to train for pocket strength (5:13).
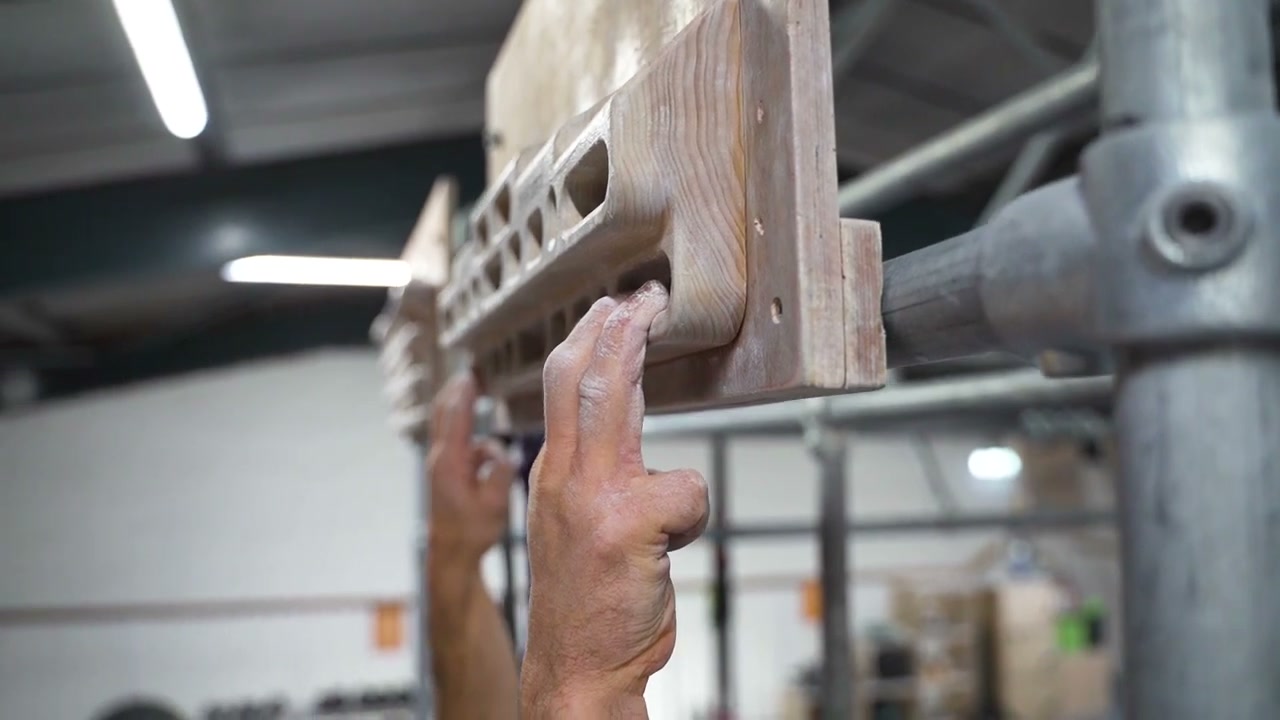
You can train slopers on a hangboard too, but as Gresham says at 5:20, climbing is the better way to practise them.
Coaches differ a little on the open grip. Lattice’s Ollie Torr suggests beginners use all four fingers, in either an open or half crimp position, whichever feels comfortable (3:42). His reason is that the three-finger open grip, which he calls the front three drag, is comfortable but trains you to use only that position, so it carries over less to other holds (4:00). If you are not sure, four fingers is the simpler place to start.
Both coaches agree on the full crimp, with the thumb wrapped over. Leave it out for now. Lattice says it puts a lot of strain through the finger joint (3:53).
How do you make it easier or harder?
As Gresham explains at 5:27, there are two ways to change how hard a hang is.
Change the hold. A smaller hold puts more load on your fingers, a bigger one less (5:36).
Use your feet. Clip a resistance band or a rope and pulley rig under the board and stand in it (5:46). A thick, stiff band takes more of your weight on your feet, and a thin one less. With a pulley, more weight on the pulley means more weight on your feet.
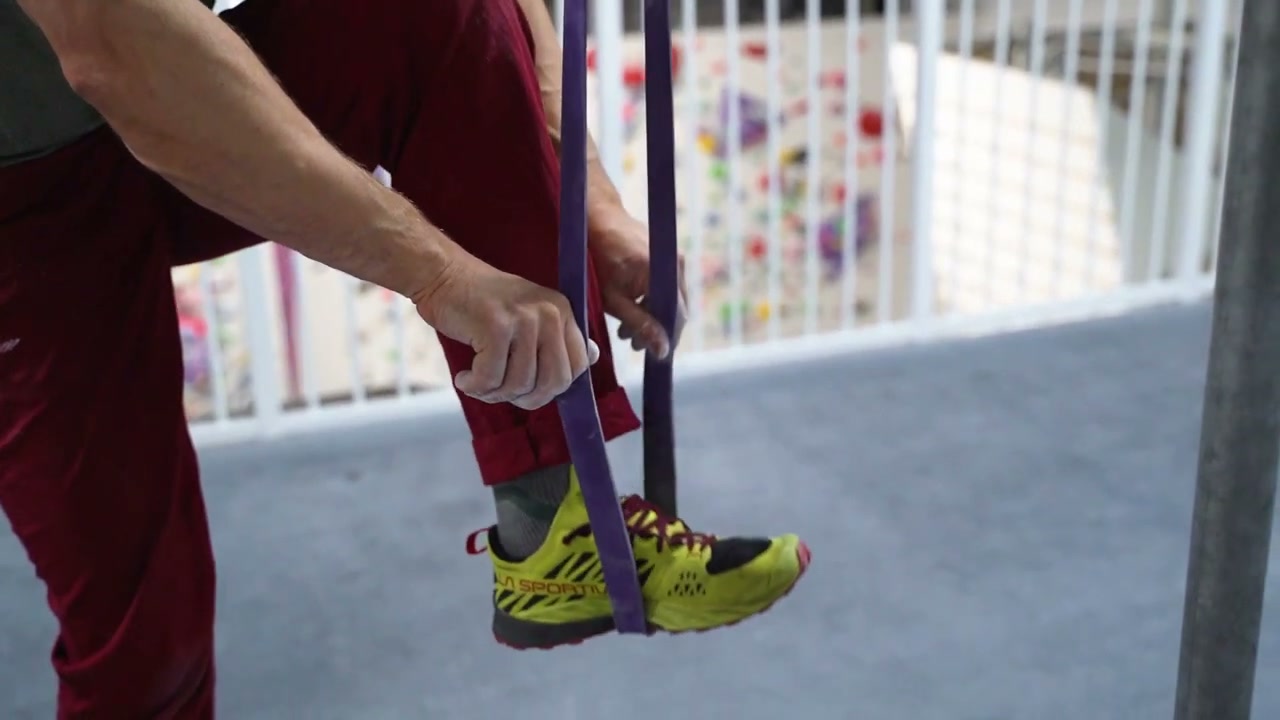
No band or pulley? Lattice’s guide gives two simpler options (2:06). Put one foot on a chair under the board, keeping the space clear, or keep both feet on the ground and take just enough weight off them to make the hang hard without failing.
As Lattice points out at 1:36, a bigger edge or some help from your feet still gives you a good strength training stimulus. You do not need your full body weight on your fingers to get stronger.
How do you know when to stop a hang?
The rule from Lattice’s beginner guide (0:45) is simple. You should not be reaching failure. If your fingers are opening out or slipping off, the hang is too hard. Finish every hang with a bit left in the tank.
Torr gives two clear stop signals at 8:13.
- On a half crimp, if your fingers start to creep open under load, end the hang. That puts a lot of stress through the soft tissues of your fingers.
- On an open grip, if your little finger starts to slip off and your hand opens out, end the hang.
Either way, put your feet down, rest, and take some load off for the next set.
Not every coach agrees on this. Dave MacLeod’s beginner video has you hang to failure (33:06), bringing your feet down just before your fingers slip (35:49). For a first few months on a board, we have gone with Gresham and Lattice. Stop early.
Hangboarding for beginners, a first session step by step
From 6:16, Gresham’s advice is to keep it simple. Avoid the very highest loads and the very smallest holds. Instead use a slightly bigger hold and hang for a bit longer, which he calls base strength (6:27).
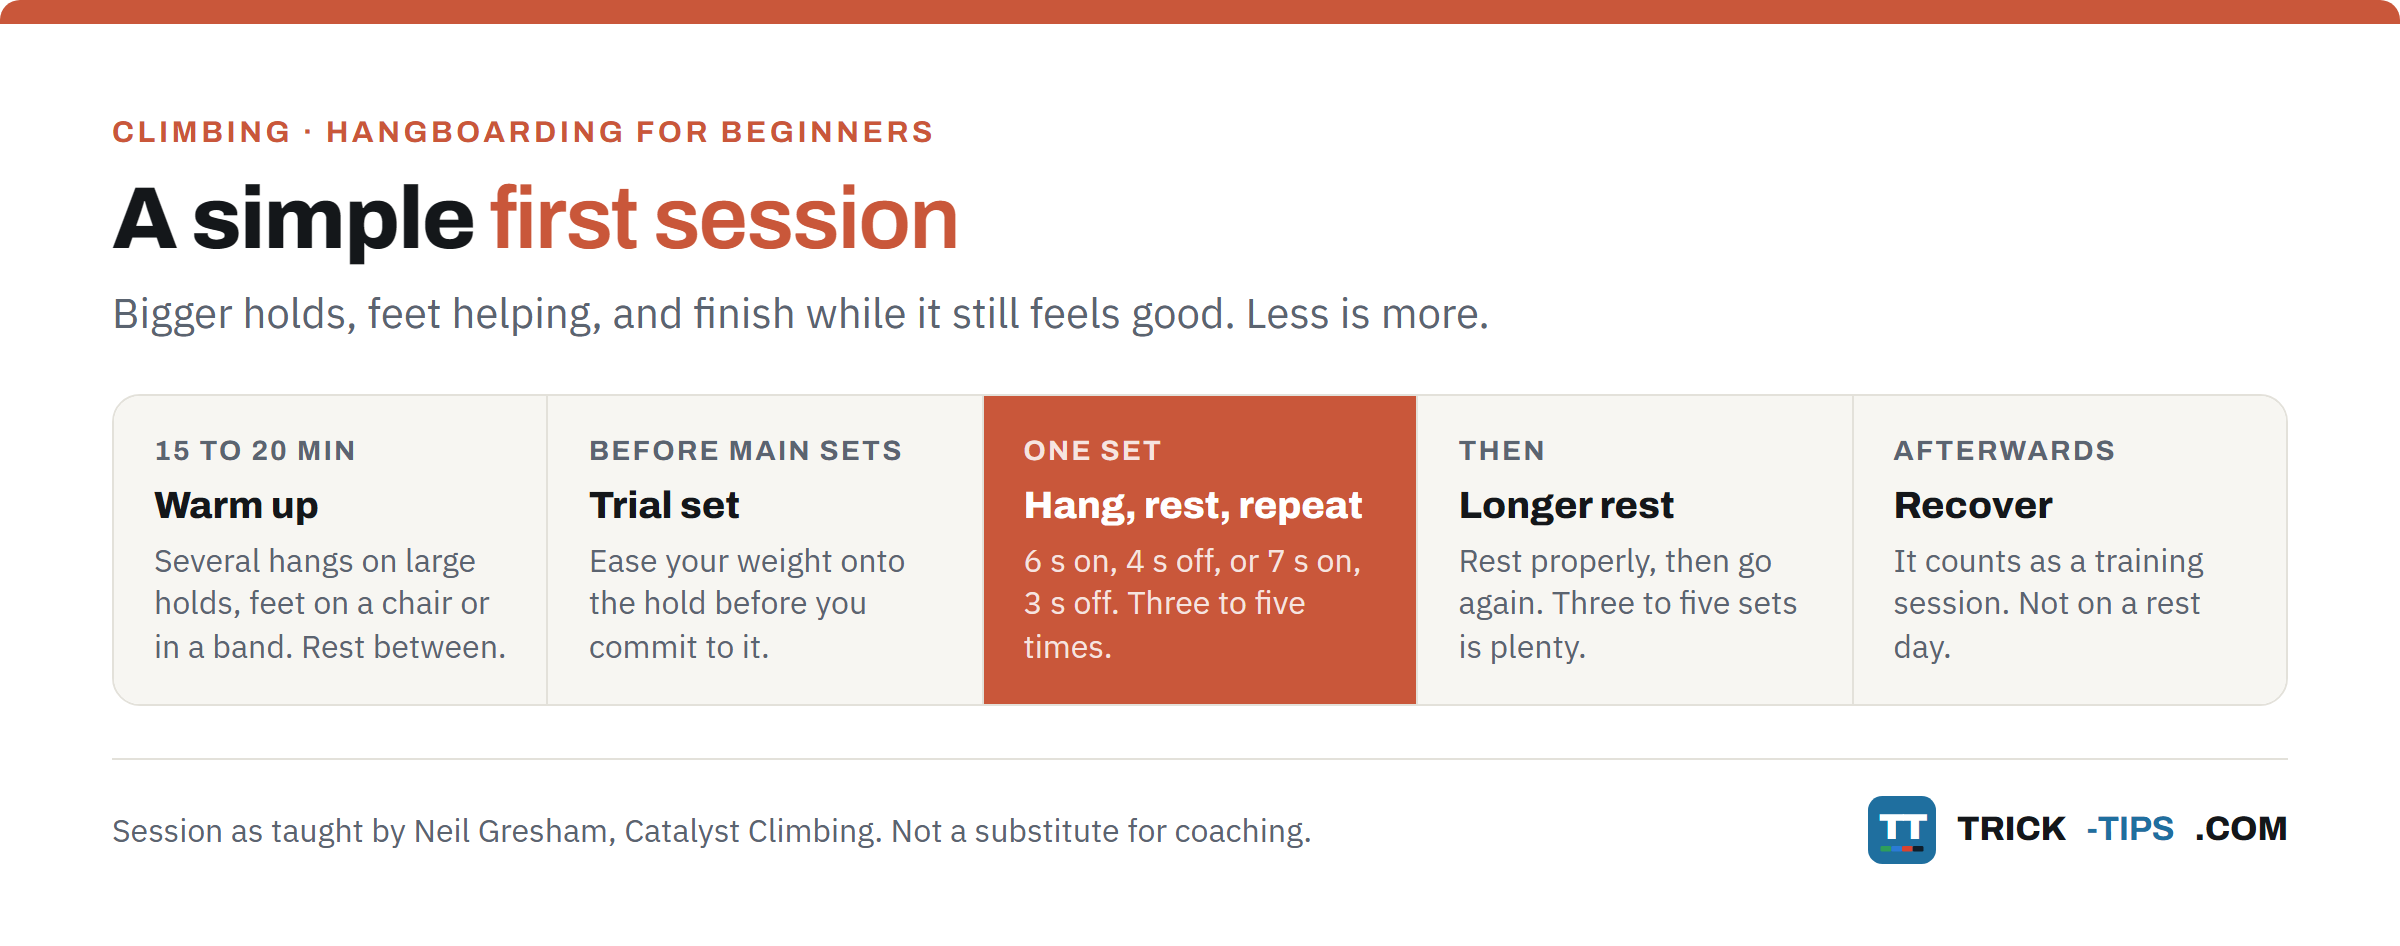
- Warm up for 15 to 20 minutes. Several hangs on large holds with your feet helping, and rests in between, to get your tendons used to the load (2:56).
- Do a trial set. Before your main sets, ease your weight onto the hold before committing to it (3:22).
- Hang and rest, three to five times. 6 seconds on and 4 seconds off, or 7 seconds on and 3 seconds off (6:35). That is one set.
- Take a longer rest, then go again (6:48). Gresham does not put a number on the rest. Lattice’s two beginner videos use one to two minutes between sets (6:18 in the beginner guide, 12:10 in the panel video). The BMC’s basic fingerboard routine uses three.
- Stop at three to five sets. For beginners, he says at 6:53, that is more than enough.
The BMC’s basic fingerboard routine uses the same 7 seconds on, 3 seconds off pattern.
How hard should each hang feel? Lattice’s panel video suggests about six or seven out of ten for a beginner, which for many people means some weight still on their feet (11:41). As it says at 12:15, the session should not be exhausting.
How often should beginners hangboard?
Not much. As Gresham puts it at 7:08, if you are at the climbing wall at least twice a week, there is probably not room for more than a couple of hangboard sessions on top of that. In general with hangboarding, less is more (7:21). Keep the quality up and get enough recovery between sessions.
Lattice’s guide says the same from 7:12. Many people make big gains from one or two sessions a week, and even someone who is not climbing at all should not go beyond two or three.
And remember the earlier rule. A hangboard session is training, so it does not go on a rest day (3:53).
Common mistakes when you start hangboarding
Skipping the warm-up. Gresham’s first safety rule is fifteen to twenty minutes on big holds first (2:56).
Going straight to full body weight. Use the trial set, and use your feet (3:22, 5:46).
Locked straight arms, or a deep lock-off. Keep a very slight bend (3:35).
Hanging on through it. Fingers opening or the little finger slipping means the hang is over (Lattice, 8:13). A strain means let go (4:19).
Training on rest days. It is a training session and you need to recover after it (3:53).
Too much, too soon. Jason Hooper, in the Lattice panel video, puts the real risk down to load management, adding too much hangboarding on top of everything else (1:45). Two short sessions a week is plenty.
Replacing climbing with it. It is supplementary. Climbing is the main event (1:41).
Beyond the video
A couple of things the videos do not spell out, each checked against more than one source.
If a finger hurts, stop. Gresham’s rule is to let go as soon as you feel a strain (4:19). Lattice’s physio, Cristiano Costa, writes that carrying on regardless of pain is rarely a good idea, and the BMC warns that it is possible to permanently damage your fingers through over-training. The American Alpine Institute lists a pop, swelling, bruising and pain when you straighten the finger as signs of a pulley injury, and its advice is to stop climbing straight away and take advice from a practitioner who specialises in climbing. Do not train through finger pain. Get it looked at.
There is no agreed starting grade. In the BMC’s guide to fingerboarding, Dave MacLeod says grade is irrelevant and it is the circumstances that count. Other coaches talk in time, like the one to two years in Lattice’s panel. So there is no number to wait for. What every source here agrees on is keeping the load light while you start.
Other good videos on hangboarding
- Lattice Training, Fingerboarding and hangboarding, a beginner’s guide. Eleven minutes from Ollie Torr. The best source for the stop signals (8:13) and hanging position (9:03). It skips the warm-up, so use Gresham’s. It ends with Lattice’s own benchmark for its paid plans, a 10 second hang at body weight on a 20 mm edge (10:31). That is an entry test for their training plans, not a safety standard. Lattice sells training plans and runs the Crimpd app.
- Lattice Training, Should beginner climbers hangboard? Thirteen minutes with Jason Hooper of Hooper’s Beta and Tyler Nelson, on why load management is the real risk, and a gentle feet-on-the-floor beginner session at the end (11:12). More talking than doing.
Where this fits
A hangboard makes your fingers stronger. It does not make you a better climber on its own, which is why Gresham keeps climbing as the main event.
- Technique is still the quickest win at the wall. Flagging is a good first movement skill to work on.
- If you are taking your climbing outdoors, start with your first day sport climbing.
- And once your fingers let you try harder moves, you will fall off more. How to fall safely when climbing covers your first lead falls.
Frequently Asked Questions
Should beginner climbers use a hangboard?
They can, if they keep it light. Neil Gresham’s view is that beginners are fine on larger holds with a foot in a stirrup to take some weight, as long as the board stays a supplement and climbing stays the main event. Coaches differ on when to start, and Lattice Training’s panel defines a beginner as someone climbing for one to two years.
How long should a beginner hang on a hangboard?
Gresham suggests 6 seconds on and 4 seconds off, or 7 seconds on and 3 seconds off, repeated three to five times, then a longer rest, for three to five sets. Use a slightly bigger hold than you think, with your feet taking some weight, and finish every hang before your fingers start to open or slip.
How often should beginners hangboard?
Once or twice a week. Gresham says that if you climb at least twice a week, there is not room for more than a couple of hangboard sessions on top, and less is more. Lattice Training says even someone not climbing at all should stay at two or three sessions a week at most.
What size edge should a beginner use?
Start on the bigger edges. Gresham’s three sizes are large at 30 to 40 mm, medium at about 20 to 25 mm and small at about 15 mm, and he tells beginners to avoid the smallest holds. Lattice’s beginner session uses an edge deep enough to cover the end of your finger, about 20 mm for some people and 25 mm or more for bigger hands.
Can hangboarding injure your fingers?
Yes, if it is overdone or done carelessly. Gresham says injuries are usually down to the climber’s own error, and Jason Hooper, in Lattice’s panel video, puts the real risk down to too much load and too little recovery. Warm up properly, use your feet, avoid monos and the full crimp, never train through pain, and get any finger pain checked by a physio who works with climbers.
What is the difference between a hangboard and a fingerboard?
Nothing. They are two names for the same training board, which is why Lattice Training’s beginner guide puts both words in its title. Use whichever your wall uses.
In short
Hangboarding for beginners comes down to keeping it light. Big holds, feet helping, a proper warm-up, short hangs that end before your fingers open, and no more than a couple of sessions a week.
Next session at the wall, try Gresham’s warm-up and three sets of 7 seconds on, 3 seconds off on a large edge with your foot in a band. Then go climbing, because that is still the main event.
Ask any questions in the comments below.